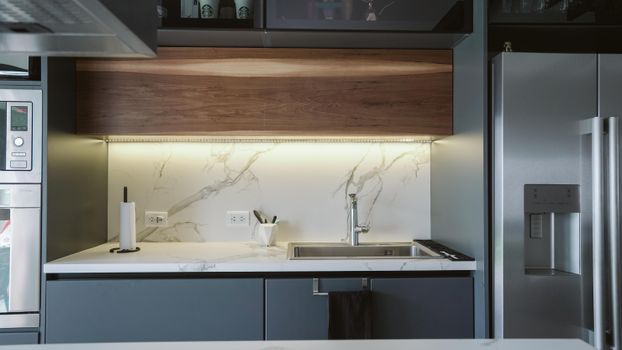
Adding LED lighting under your kitchen cabinets is one of the most effective ways to elevate both the function and style of your kitchen. Not only does it provide essential task lighting for cooking and food prep, but it also creates a warm, inviting atmosphere that enhances the heart of your home. Whether you’re a seasoned DIYer or just someone looking to brighten up your kitchen, installing LED lighting under your cabinets is a project well within your reach. In this step-by-step guide, we’ll walk you through everything you need to know—from selecting the right LED system to the final installation—so you can transform your kitchen in just a few hours.
Why Install LED Lighting Under Kitchen Cabinets?
LED under-cabinet lighting has become increasingly popular in modern kitchens, and it’s easy to see why. According to a 2023 survey by the National Kitchen & Bath Association, 71% of kitchen remodels included under-cabinet lighting, with LEDs being the preferred choice for energy efficiency and longevity.
Key benefits include:
- Task Lighting: Direct illumination on countertops makes food preparation safer and easier. - Energy Efficiency: LED lights use up to 75% less energy than traditional incandescent bulbs, according to the U.S. Department of Energy. - Aesthetics: LEDs add a sleek, contemporary look that can be customized with dimmers or color temperature options. - Longevity: Quality LED strips often last over 25,000 hours—more than 10 years in typical use.Given these advantages, installing LED under-cabinet lighting is one of the smartest kitchen upgrades for both visual appeal and practicality.
Choosing the Right LED Under-Cabinet Lighting System
The first step is selecting the type of LED lighting that best suits your kitchen layout, design goals, and installation skills. There are three main options:
1. LED Strip Lights: Flexible, adhesive-backed strips that provide even illumination. Ideal for continuous lighting and easy DIY installation. 2. LED Puck Lights: Small, circular fixtures great for spot lighting or accenting specific areas. 3. LED Bar Lights: Rigid, linear fixtures that offer uniform light—often used for professional installations.To help you compare, here’s a quick overview:
| Type | Ease of Install | Light Quality | Best For | Average Cost (per foot) |
|---|---|---|---|---|
| LED Strip Lights | Easy | Even, Continuous | DIYers, Modern Look | $10-$20 |
| LED Puck Lights | Moderate | Spot, Focused | Accent Lighting | $15-$30 |
| LED Bar Lights | Moderate | Uniform, Bright | Professional Finish | $20-$40 |
For most homeowners, LED strip lights are the top choice due to their affordability, flexibility, and ease of installation. However, if you desire a specific look or need to light irregular spaces, puck or bar lights may be preferable.
What You’ll Need: Tools and Materials Checklist
Before you begin, gather the necessary tools and materials. Here’s a basic checklist for a standard LED strip light installation:
- LED strip lighting kit (includes LED strips, power adapter, and connectors) - Measuring tape - Pencil and notepad - Rubbing alcohol and a clean cloth - Scissors (for cutting strips, if needed) - Screwdriver (for mounting hardware, if required) - Double-sided adhesive tape (if not included) - Wire clips or cable organizers - Optional: dimmer switch or remote control moduleMake sure to choose LED strips with the appropriate color temperature for your kitchen. Warm white (2700K–3000K) creates a cozy feel, while cool white (4000K–5000K) is great for modern, bright kitchens.
Step-by-Step Guide: How to Install LED Lighting Under Kitchen Cabinets
Ready to get started? Follow these simple steps for a professional-looking installation.
1. Plan Your Layout
Begin by measuring the length of your cabinets where you want to install the lights. Note any obstacles, such as hinges or outlets, and decide if you’ll need to cut or join strips. Sketch your layout on paper for reference.
2. Prepare the Surface
Clean the underside of the cabinets with rubbing alcohol and a cloth. This ensures the adhesive will stick firmly and the installation will last.
3. Cut and Position the LED Strips
Most LED strips can be cut to size at marked intervals (usually every 1–2 inches). Use scissors to cut only at these marks. Lay out the strips along the underside of the cabinets to confirm the fit.
4. Stick the LED Strips in Place
Peel off the adhesive backing from the LED strips and carefully press them onto the cabinets, following your layout. Apply gentle pressure to ensure a strong bond. If your kit did not include adhesive, use double-sided tape or mounting clips.
5. Connect the Strips and Power Supply
Attach any required connectors to bridge gaps between cabinet sections. Plug the strips into the power adapter. Route the power cable along the cabinet edge, securing it with wire clips or cable organizers for a tidy finish.
6. Test the Lights
Plug the system into a nearby outlet and switch it on. Check for even lighting and adjust strips or connectors if necessary. If your system includes a dimmer or remote, test its functions at this stage.
7. Final Touches
Tuck away any visible wires, ensuring nothing hangs loosely. If you’re handy with electrical work, consider hardwiring the system or using a smart plug for added convenience.
Tips for a Clean, Professional Finish
- Conceal Wires: Use cable channels or paintable wire covers to hide power cords along the wall or back of cabinets. - Even Spacing: Position strips at least 2 inches from the cabinet front edge for optimal light diffusion and to avoid glare on shiny countertops. - Use Diffusers: Some LED kits include snap-on diffusers to soften the light and minimize “hot spots.” - Smart Controls: Many modern LED kits are compatible with Wi-Fi, Alexa, or Google Home, enabling voice control and smart scheduling.A 2022 report by Statista found that 41% of smart home adopters use lighting automation, highlighting how integrating technology can further enhance your kitchen lighting experience.
Common Mistakes to Avoid When Installing LED Under-Cabinet Lighting
Even straightforward projects can have pitfalls. Here are some common mistakes and how to avoid them:
- Skipping Surface Prep: Failure to clean the surface can lead to adhesive failure and sagging strips. - Overloading Power Supply: Make sure your power adapter can handle the total wattage of your LED strips. Exceeding capacity can cause flickering or system failure. - Poor Placement: Installing strips too far back in the cabinet can create uneven lighting or shadows. - Ignoring Color Consistency: Mixing different color temperatures results in an uneven appearance. Purchase all strips from the same manufacturer and batch if possible. - Not Testing Before Finalizing: Always test your system before securing all wires and covers. It’s easier to fix problems before everything is hidden away.Enhancing Your Kitchen with Advanced LED Features
Once you’ve mastered the basics, consider these advanced options to further customize your under-cabinet lighting:
- Color-Changing LEDs: Some kits offer RGB or tunable white options, allowing you to change the mood from cool daylight to warm evening tones with a remote or app. - Motion Sensors: Add convenience by installing motion-activated switches—ideal for hands-free operation when cooking. - Dimmable Drivers: Install dimmable drivers or in-line dimmer switches for precise control over brightness. - Integrated Power Outlets: Newer LED systems sometimes integrate USB or traditional outlets, adding functionality to your kitchen workspace.According to a 2023 HomeAdvisor survey, kitchens with customized lighting features like dimmers and smart controls saw a 12% higher satisfaction rate among homeowners post-renovation.
Bright Results: Enjoying Your Upgraded Kitchen
Installing LED lighting under your kitchen cabinets is a manageable DIY project that delivers significant rewards. Not only will you enjoy improved task lighting and a modern, stylish look, but you’ll also benefit from energy savings and increased home value. With a bit of planning, the right materials, and careful installation, your kitchen will be brighter, more functional, and more inviting for years to come.